Wood And Stains
Various species of wood color differently for a given stain and, obviously, a given species of wood colors differently for various stains. Wood stains basically come in two types; Penetrating stains and Gel stains. Penetrating stains penetrate deeply into the wood and Gel stains do not. Pre-Stain Wood Conditioners are available to cause wood to absorb stain more evenly and, thus, produce a more uniform color.
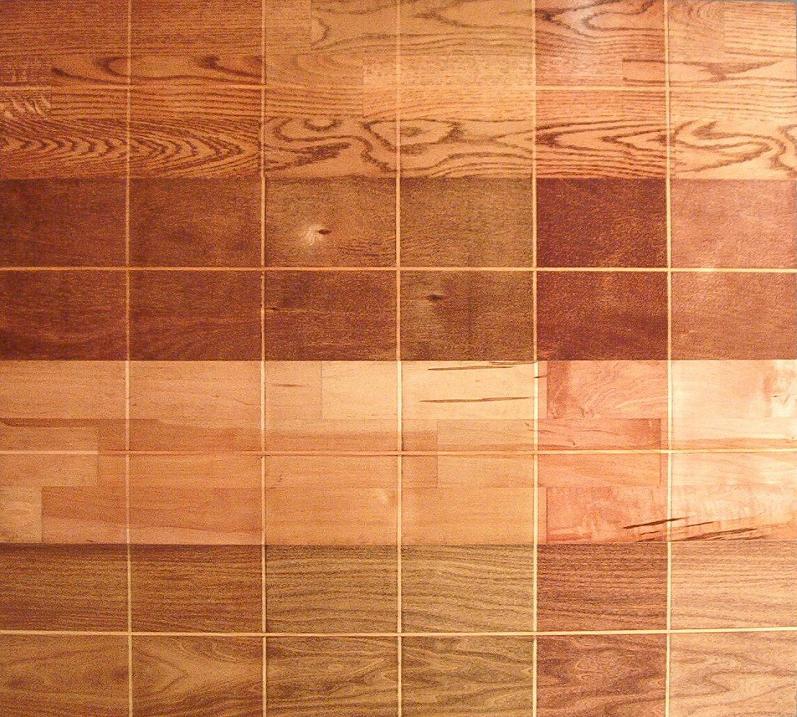
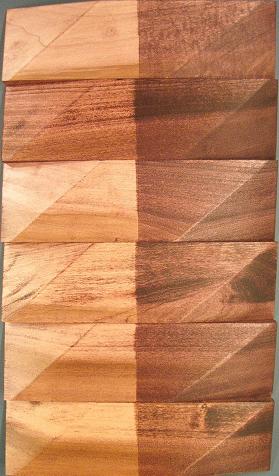
In this demonstration, four species of wood are stained with six various stains with and without Pre-Stain Wood Conditioner first applied. The spieces of wood follow as given from top to bottom in the photo to follow:
1. Oak
2. Birch
3. Maple
4. Poplar
The Minwax wood stains applied to each species of wood follow as given from left to right in the photo to follow:
The photo below shows the various species of wood each stained with two applications of the various stains with and without a Pre-Stain Wood Conditioner applied before staining. Pre-Stain Wood Conditioner was only applied to the lower portion of each species:1. Provincial (211)
2. Special Walnut (224)
3. Dark Walnut (2716)
4. Jacobean (2750)
5. Red Mahogany (225)
6. Brazilian Rosewood (Gel, 608)
The photo above shows that Maple absorbs the least amount of stain and that the Pre-Stain Wood Conditioner has little, if any, affect on any of the various species of wood.
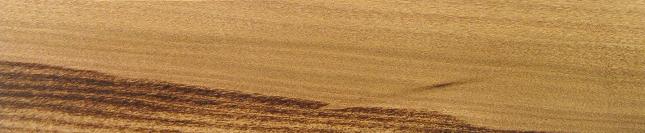
The photo below shows an example on Poplar where the Pre-Stain Wood Conditioner failed miserably to cause the Special Walnut (224) stain to absorb evenly and produce a uniform color. Note how the green (less porous and harder) portions of the wood accepted little stain but the white (more porous and softer) portions of the wood accepted much stain thus darkening that portion of wood much more.
Stain Absorbtion
Maple and other similar types of wood are very poor at absorbing stain when sanded smoothly. Notice in the first photo of the previous section how the smooth sanded and stained Maple is much lighter than the other species of wood. Wood can be made to absorb more stain by any of the following:
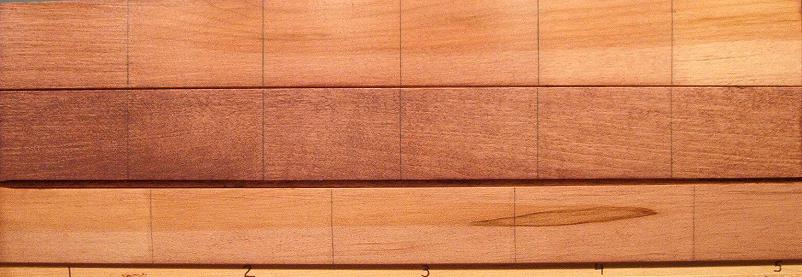
The photo below shows the results of Maple sanded with increasing grits of sandpaper, sanded and grain raised, and increasing number of applications using Minwax Red Mahogany (225) penetrating stain:1. Sand with coarser grit sandpaper.
2. Raise wood grain (rinse/dip in water and allow to dry at least 12 hours).
3. Apply additional coats of stain.
The top piece was sanded with 80 grit through 600 grit sandpaper and then stained. The middle piece was sanded with 80 grit through 600 grit sandpaper, the grain then raised, and then stained. The bottom piece was sanded with 320 grit sandpaper and then 1 through 5 applications of stain were applied.
The photo below shows the results of Maple treated exactly as that above but using Minwax Brazilian Rosewood (608) gel stain:
Notice that the gel stain is much less blotchy than the penetrating stain especially when the grain is raised.
Stain Uniformity
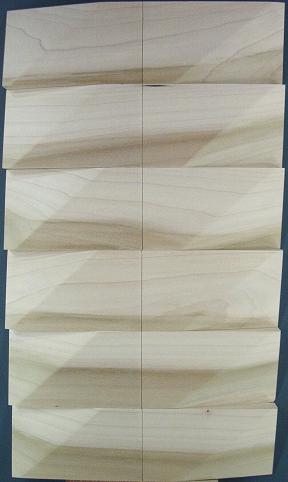
Maple and other similar types of wood, for example Poplar, are very poor at absorbing stain uniformly. Pre-Stain Wood Conditioners and various types of stain are available to improve uniform stain absorbtion. The left photo below shows six sections of multi-color Poplar cut from the same board that have been cut at 10 degrees depth and height on the ends to expose end grain, sanded with 320 grit sandpaper, and then the right side dipped in water and allowed to dry to raise the grain. The right photo below shows the same sections after performing the various staining operations described below the photos:
The stains applied to each section, from top to bottom, are listed below. The stains used are Minwax Brazilian Rosewood (608) gel stain, Red Mahogany (225) penetrating stain, Natural (209) penetrating stain. The Pre-Stain Wood Conditioner is also by Minwax.
1. Gel Stain
2. Penetrating Stain
3. Gel Stain, Penetrating Stain
4. Pre-Stain Wood Conditioner, Penetrating Stain
5. Pre-Stain Wood Conditioner, Gel Stain, Penetrating Stain
6. Natural Stain, Penetrating Stain
As can be seen in the right photo above, the most uniform staining results are those where the wood grain was raised and gel stain was applied to the bare wood first; that is, sections 1 and 3. Note that these results are better than any of those where Pre-Stain Wood Conditioner was used; that is, sections 4 and 5.
In an attempt to produce uniform staining to reduce blotchy results, it is possible to first apply a sealing agent, sand after allowing to dry, and then stain. The major issue with this method is that the wood surface must be sanded evenly after sealing to produce satisfactory results. This may be an issue with highly contoured, checkered, or carved wood. The two sealing products listed below will be used in this demonstration: Stain Uniformity By First Sealing
1. Zinsser Bulls Eye ShellacThe photos below are of a piece of Maple Hand Rail that has sharp contours (side), gradual contours (top), and no contours (bottom). There are four 3 inch sections that are treated as follows after sanding with 320 grit sandpaper before staining:
2. Minwax Sanding Sealer
1. Left: No TreatmentThe means used in an attempt to assure even sanding will be to sand the entire surface till all pencil markings, that show the 3 inch treated sections, have been removed.
2. Left Center: Apply Shellac, allow to dry, sand with 320
3. Right Center: Apply Sanding Sealer, allow to dry, sand with 320
4. Right: Apply Pre-Stain Wood Conditioner
The photo below shows the highly contoured side that will be stained with Dark Walnut (2716) after the Shellac (center left section) and Sanding Sealer (center right section) have been applied:
The photo below shows the highly contoured side stained with Dark Walnut (2716) after sanding with 320 and the far right section treated with Pre-Stain Wood Conditioner:
The photo below shows the highly contoured side that will be stained with Red Mahogany (225) after the Shellac (center left section) and Sanding Sealer (center right section) have been applied:
The photo below shows the highly contoured side stained with Red Mahogany (225) after sanding with 320 and the far right section treated with Pre-Stain Wood Conditioner:
The photo below shows the slightly contoured side (top) stained with Red Mahogany (top section in photo) and Dark Walnut (bottom section in photo) after sanding with 320 and the far right section treated with Pre-Stain Wood Conditioner:
The photo below shows the flat side (bottom) stained with Dark Walnut (top section in photo) and Red Mahogany (bottom section in photo) after sanding with 320 and the far right section treated with Pre-Stain Wood Conditioner:
It is worthy to note that the Shellac was more difficult to sand than the Sanding Sealer and also hampered the sanding effort because of the waxy substance that resides in shellac.
As can be seen in the photos above, the most uniform staining results appear to be those treated with the Sanding Sealer. Note that the Pre-Stain Wood Conditioner once again fails to produce uniform staining.