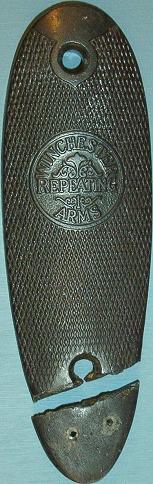
The butt plate to be repaired is shown in the photo below:
Notice the nail holes of a previous repair where nails had been used to nail the broken off piece to the stock.
To make a durable and permanent repair, the plate is pinned with ring shanked nails and glued with epoxy. The ring shanked nails provide a repair that is stronger than the material that the plate is made of. The nail shank rings produce voids between the ring valleys and the walls of the hole drilled into the plate where epoxy will fill and bond. The epoxy also bonds the broken edges and fills any surface imperfections.
1. Ring Shanked Nails (e.g. Paneling nails) Materials Needed
2. Drill Press
3. Drill Press Clamp
4. Rubber Band
5. Epoxy
6. Small Wooden Blocks
7. One Inch Drywall Screws
8. Clamps
9. Masking Tape
10. 180, 320, 400, 600 Grit Sandpaper
11. Fine Steel Wool
NOTE: Read, understand, and follow all product labeling precautions and directions.
Step 1: Prepare
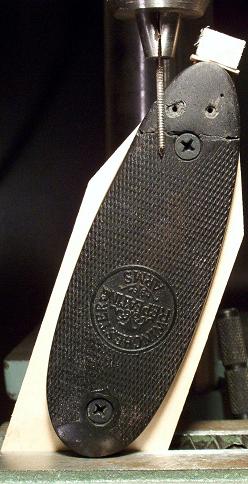
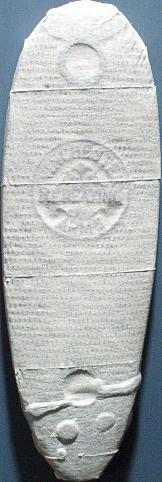
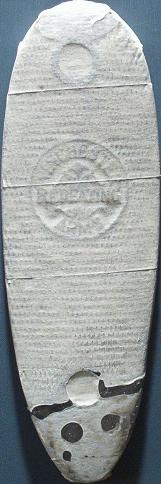
After thorough cleaning, the plate is mounted to a wooden block. The broken off piece is then precisely aligned and clamped to the block and tight against the plate by use of a small piece of wood that is screwed down to the edge of the block forcing the broken piece against the plate. A section of rubber band may be placed between the screwed down block and the edge of the broken piece to produce a flexible clamping force. The block with the mounted plate is then clamped in the drill press clamp. Holes are then drilled in the edge of the plate at the optimal location, angle, and depth that the ring shanked nails will be inserted into. The photos below show the mounted and clamped plate and the location, angle, and depth that the two ring shanked nails will be installed in the plate:
Step 2: Repair
Drill the holes precisely in the middle of the edge of the plate. After the holes are drilled, the plate is removed from the wooden block and any drill shavings are removed. To prevent glueing the plate to the wooden block, a thin piece of plastic is placed on the wooden block where the plate mounts. The plate is once again mounted to the wooden block. Epoxy is spread on both of the broken edges of the plate and the broken off piece is once again clamped into place. The ring shanked nails are coated with epoxy and inserted into the drilled holes. To thoroughly coat the inner walls of the drilled holes, the nails are pushed in and pulled out of the holes several times to force epoxy into the holes. Allow the epoxy to cure for at least as long as indicated in the instructions.
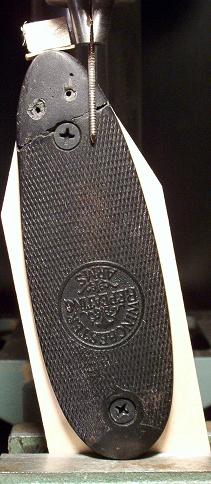
After the epoxy has fully cured, the plate is removed from the wooden block. The extending ring shanked nails are ground slightly below the surface of the edges of the plate. The recessed tips of the ring shanked nails and remaining surface imperfections are filled with epoxy and allowed to cure as shown in the photo below:
After the epoxy has fully cured, the entire plate is masked with a single layer of masking tape and is pressed firmly down along the edges of the epoxy that extends beyond the surface of the plate. The photo below shows the taped plate:
Using 180 and then 320 grit sandpaper, carefully block sand the epoxy down to the surface of the surrounding areas by sanding just until the tape is sanded off around the epoxy and the adhesive underneath begins to be exposed. The photo below shows the sanded epoxy plate with tape:
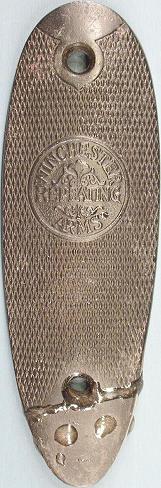
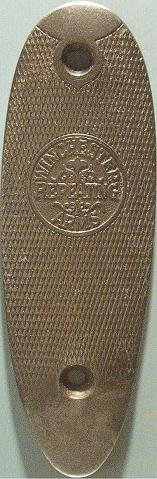
Using 400 grit and then 600 grit sandpaper, very carefully block wet sand the epoxy down to the surface of the plate without harming the surrounding areas. Complete the repair by polishing the plate with fine steel wool. The photo below shows the repaired butt plate of Winchester Model 840 serial number CE12520: