The following types of Blueing will be demonstrated:
1. Polished
2. Dark Satin
3. Touch Up
4. Delicate Areas
Materials Needed
1. Gun Blue Kit: A. Instructions2. Hot And Cold Water Source
B. Cleaner-Degreaser
C. Blue And Rust Remover
D. Blueing
E. Blueing Applicators
F. Sponge
G. 00 Steel Wool
H. Rust Preventive Wipes
3. Paper Towels
NOTE: Read, understand, and follow all product labeling precautions and directions.
Blueing
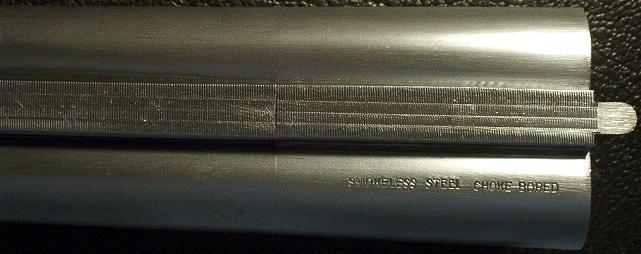
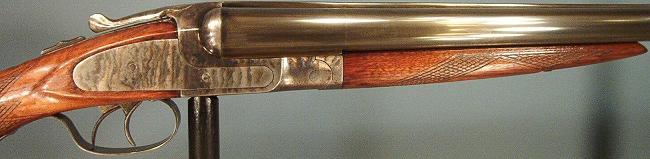
All metal on the H S.B. & CO. CRUSO (Crescent) Double Barrel Shotgun is casehardened, and in good condition, except for the barrels and trigger guard. The barrels will be blued for this demonstration.
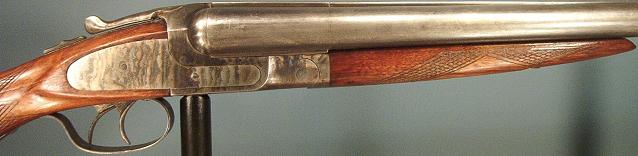
The blueing process will be shown at the top breech end of the barrels as shown below:
Blueing Preparation
Step 1: Initial Cleaning
Clean thoroughly using the Cleaner-Degreaser as indicated in instructions.Step 2: Remove Existing Blueing And Rust
Wear vinal gloves during this and all remaining steps to avoid contaminating the metal. Lay out a strip of paper towels on the work area and keep items sanitary. Remove existing blueing and rust using the Blue And Rust Remover as indicated in instructions. The results are shown below:
Step 3: Brush, Sand, And Polish
Replace strip of paper towels on the work area with new towels and use previous towels to clean work area. All spots where pitted rust remains is effectively removed using a new fine bristled brass or stainless steel brush. The brushing technique used is to cause the tips of the bristles to poke at the rust inside the pits and not necessarily scrape across the pits. Using just enough pressure to not permanently bend the bristles, brush each rust spot using small circular and then short back and forth strokes. The short back and forth strokes should be performed while changing the angle of movement a complete 360 degree rotation. There must be no rust remaining on the metal. A very effective means of removing heavy rust is to lightly and thoroughly sandblast. If a smooth and polished finish is desired, thoroughly sand with 400 then 600 grit sandpaper and polish with steel wool. If the metal is heavily pitted, consider the option to only sandblast the metal and to not sand and polish. Sanding and polishing pitted metal will amplify the appearance of pits. The results of brushing, sanding, and polishing are shown below:
Step 4: Remove Residual Blueing And Rust
Replace strip of paper towels on the work area with new towels and use previous towels to clean work area. Remove residual blueing and rust using the Blue And Rust Remover as indicated in instructions.Step 5: Final Cleaning
At this point, cleanliness, thoroughness, and speed are of prime importance. Lacking either of these will produce less than optimal results. It is recommended that the work area be prepared and the remaining procedures be rehearsed to permit the blueing process to be performed as swiftly and effectively as possible.Put on new vinal gloves to avoid contaminating the metal. Replace strip of paper towels on the work area with new towels and use previous towels to clean work area. Thoroughly clean using the Cleaner-Degreaser, rinse thoroughly in hot water, and immediately dry with paper towels to avoid rust formation.
Blueing Application
Step 1: Apply Blueing
It is extremely important that the blueing be applied evenly, thoroughly, and swiftly. To assure an even application, apply constant pressure and movement to swab and do not reverse direction of movement while in contact with metal (e.g. continue movement past end of barrels while in contact). To assure a thorough application, apply blueing in long straight strokes that slightly overlap one another. To assure a swift application, rehearse the procedure before actual application.With saturated swab, apply blueing evenly, thoroughly, and as swiftly as possible and allow blueing to remain on metal only as long as indicated in instructions.
Step 2: Rinse And Dry
Rinse in cold water and dry with paper towels in the same manner that blueing was applied (i.e. applying constant and even pressure and not reversing direction while in contact with metal).Step 3: Repeat As Necessary
Repeat step 1 and 2 if and as indicated in instructions. The process was repeated 3 times for this demonstration.Step 4: Oil And Cure
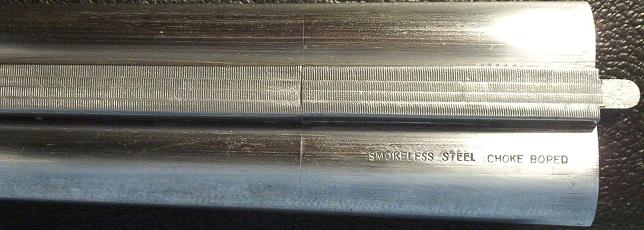
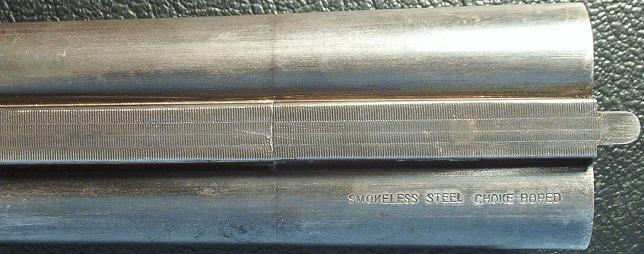
Thoroughly Oil blued metal and allow to cure at least 24 hours or as long as indicated in instructions, whichever is greater. The results are shown below:
Notice that the color is not even at the end of the barrels and appears similar to casehardened metal. This is a result of the blueing not being 100% evenly distributed on these areas. The more polished and larger the surface, the more difficult it is to acquire an even distribution of color. Since the remaining metal on this gun is casehardened, this uneven color at the end of the barrels is acceptable.
Double Barrel Shotgun Final Results
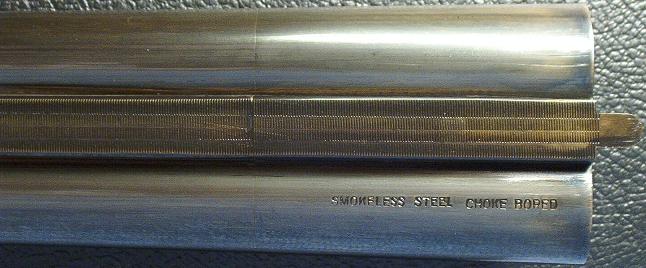
The final results after blueing the shotgun barrels are shown below:

Dark Satin Blueing
The butt plate on the Turkish Mauser Rifle has no original finish except on the back side of the plate. This plate will be blued for this demonstration.
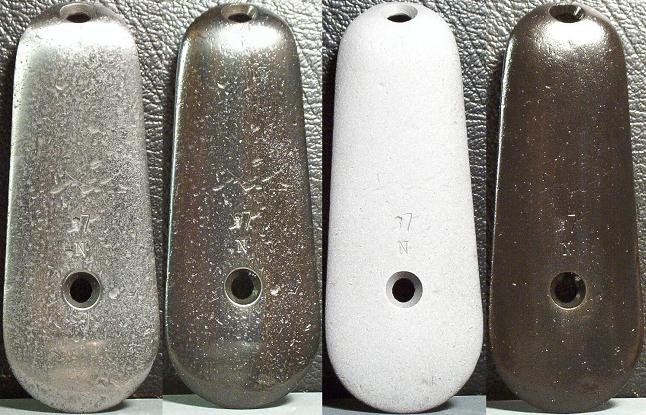
When a dark satin blueing is desired, light sandblasting in place of the blueing process brushing, sanding, and polishing produces excellent results. This type of blueing may be desired to reduce visibility of pits in the metal that are much more visible when polished and blued. This type of blueing also tends to blue more evenly than polished metal. The photos below show the butt plate polished and blued as well as sandblasted and blued:
The photos above, from left to right, are described below. Note that the first photo (far left) is of the butt plate sandblasted and blued before sanding and polishing. The blueing before sanding and polishing is optional and is done to aid in detecting minute pits that may be sanded and polished out if desired.
1. Sandblasted, blued, sanded (320, 400, 600), and polished (0000)
2. Blued
3. Sandblasted
4. Blued
Note that with the butt plate polished and blued (second photo) the pits are noticed much more than when sandblasted and blued (fourth photo).
Touch Up Blueing
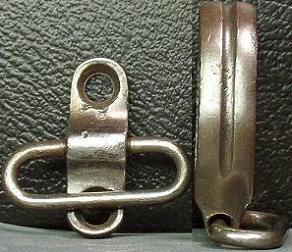
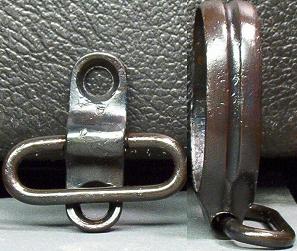
The sling swivels and trigger plate on the Turkish Mauser Rifle have very little original finish. In an effort to retain as much original finish on this gun as possible, to make the color a bit more consistent, and to provide additional protection to the metal, these items will be thoroughly cleaned with Blueing Cleaner-Degreaser and a fine bristled stainless steel brush and then blued. Refer to the brushing technique described above in Blueing Preparation; Brush, Sand, and Polish. The process of removing existing blueing is not performed.
The photos below show the sling swivels before and after blueing:
The photos below show the trigger plate before and after blueing:

Note that edges and portions where finish had been completely warn off now have color similar to the surrounding areas.
Delicate Areas Blueing
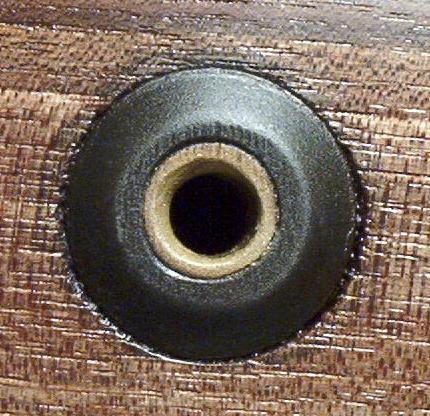
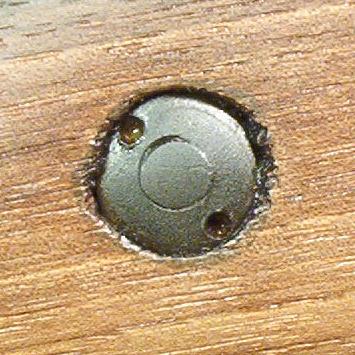
The Stock Bolt Disassembly Hole and Recoil Lug Assembly are virtually impossible to remove from Turkish Model 1903 Mauser Rifles. Therefore, these parts may only be blued while attached to the stock. Such parts, and other similar parts on other guns, may be effectively prepared for blueing by protecting the surrounding area and then lightly sandblasting and then blueing.
The photo below shows the Stock Bolt Disassembly Hole after sandblasting and then blueing with a small cotton swab:
The photo below shows the Recoil Lug Assembly after sandblasting and then blueing with a small cotton swab:
The area surrounding the metal to be sandblasted is protected by using a large washer with an inner hole the same diameter as the part being sandblasted. To protect areas surrounding the washer, a piece of 1/4 inch plywood has a hole drilled in it slightly smaller than the outside diameter of the washer.
Mauser Rifle Final Results
The before and after photos of the Mauser are shown below:
Before

After